

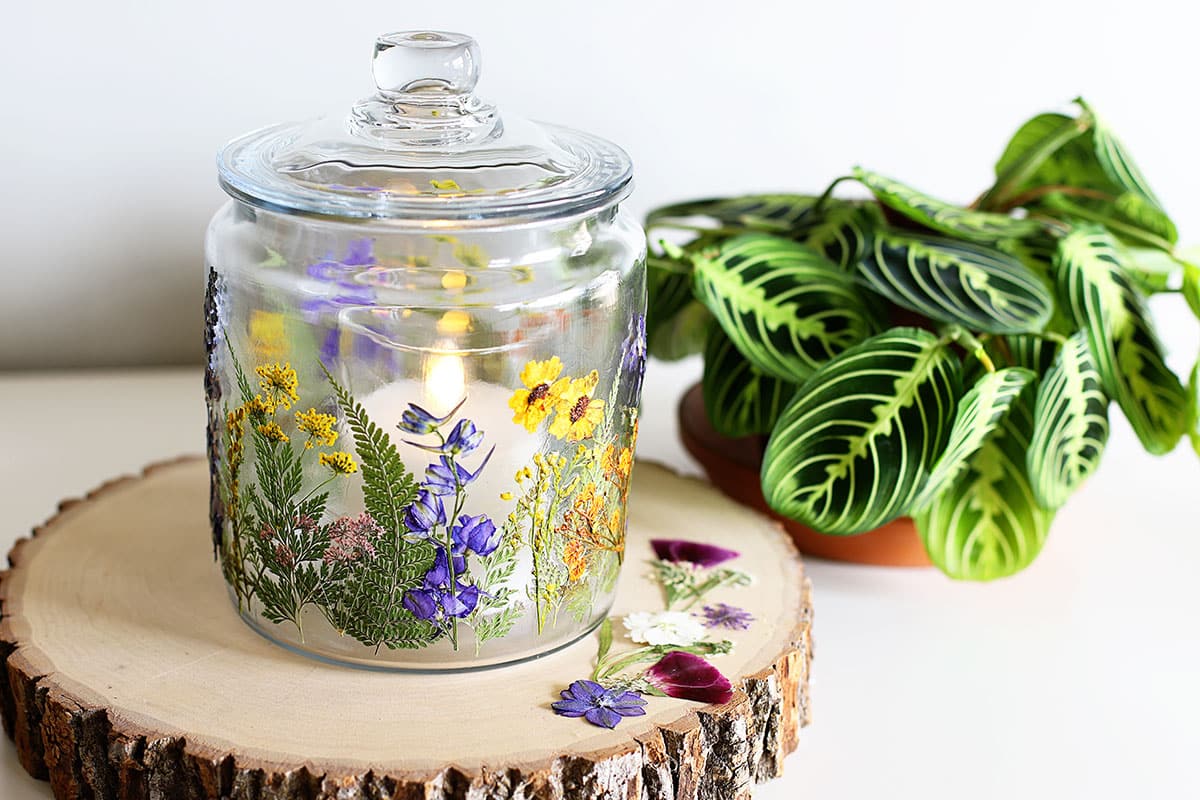
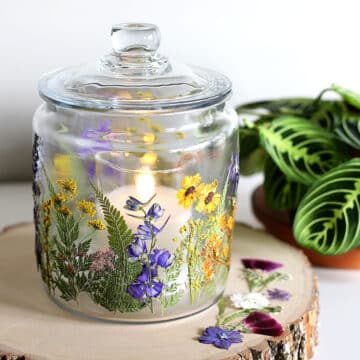
This beginner-friendly pressed flower craft is a great way to bring some spring into your home even though the weather may not be cooperating.
And no need to worry if you didn't press blooms from your garden last summer, this easy craft uses store bought dried and pressed flowers to make a pretty decorative glass jar.
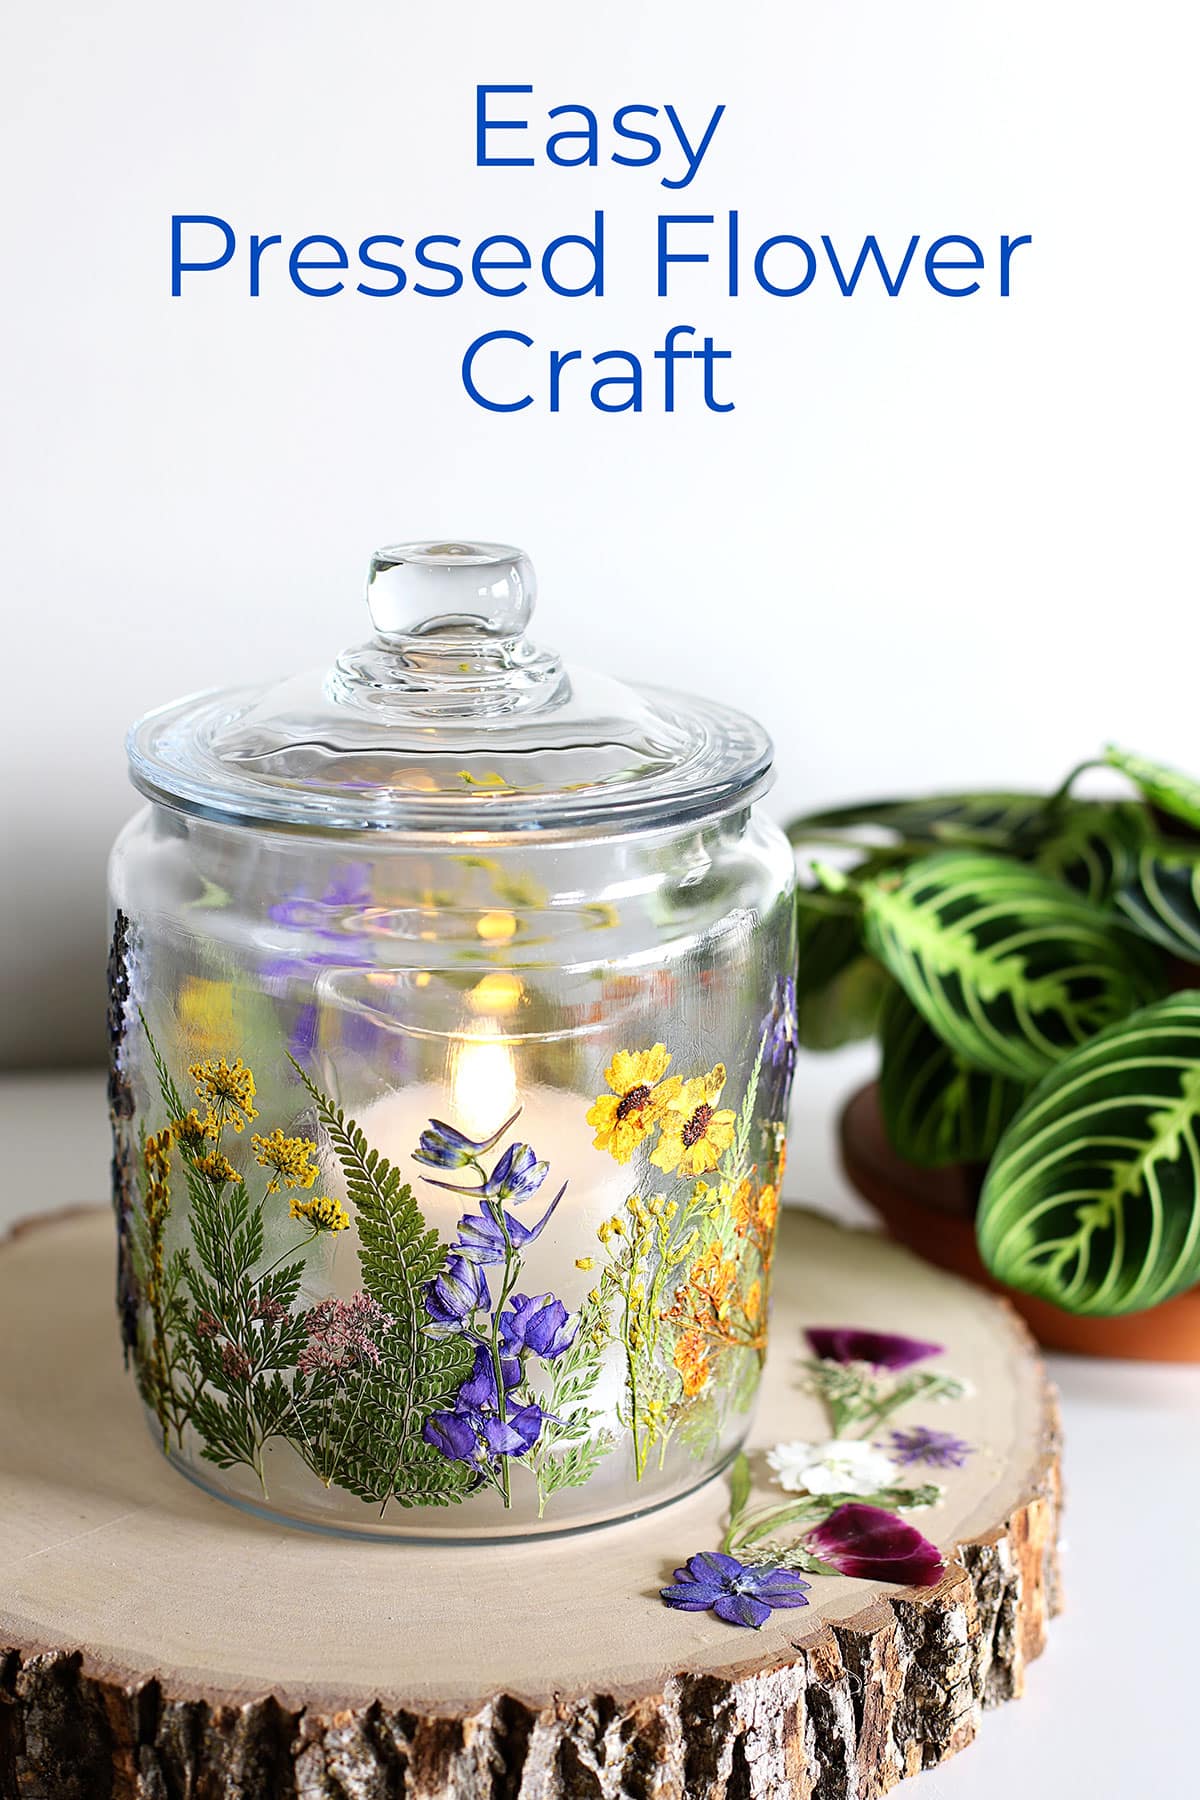
A few years ago I showed you how to create a terrarium in a jar using a 2 gallon version of this very same jar. The jar is made by Anchor-Hocking and is supposed to be used to hold pantry staples (flour, sugar, etc) or cookies and candy.
But why stick with boring uses, when there's so much more you can do with these!
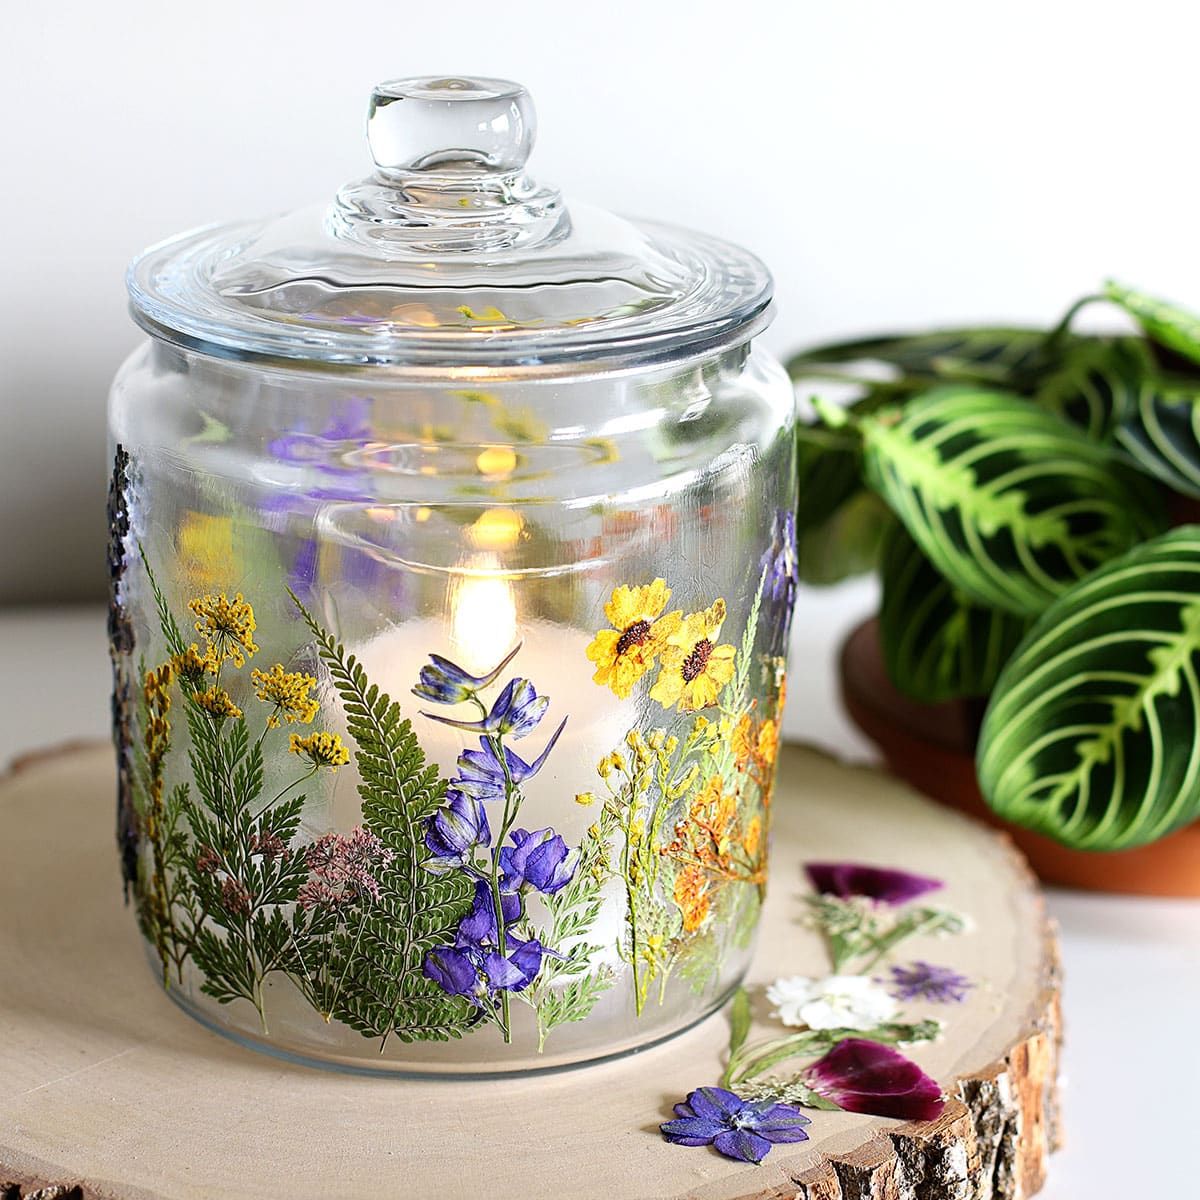
Table Of Contents
(This post contains some affiliate links for your convenience. You can read my full disclosure policy here.)
How To Apply Pressed Flowers To Glass
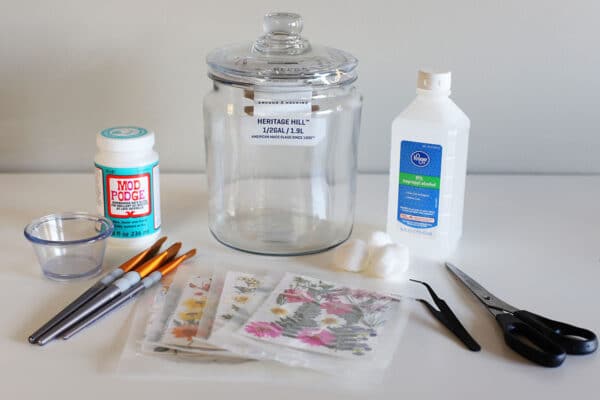
Supplies
- Glass Jar (I am using an Anchor Hocking Heritage Hill ½ Gallon Jar)*
- Pressed Flowers - see below for purchasing information
- Dishwasher Safe Gloss Mod Podge
- Rubbing Alcohol
- Cotton Balls
- Tweezers - these may come with your pressed flowers
- Soft Bristle Craft Brushes
- Scissors
*OK, the price on the ½ gallon jar from my friends at Amazon is ridiculous. Seriously, don't buy it from there unless you have no other options. Walmart has this size for around $6 and Big Lots has them for around $10. I paid around $7 for mine from a local supermarket. I have no idea why Amazon is charging so much, but I just wanted to give you that option if you want it delivered to your door.
Printable Instructions
Supplies
- Glass Jar
- Pressed Flowers
- Dishwasher Safe Mod Podge
- Rubbing Alcohol
- Cotton Balls
- Tweezers
- Craft Brushes Soft Bristle
- Scissors
Optional
Instructions
- Gather Your Supplies

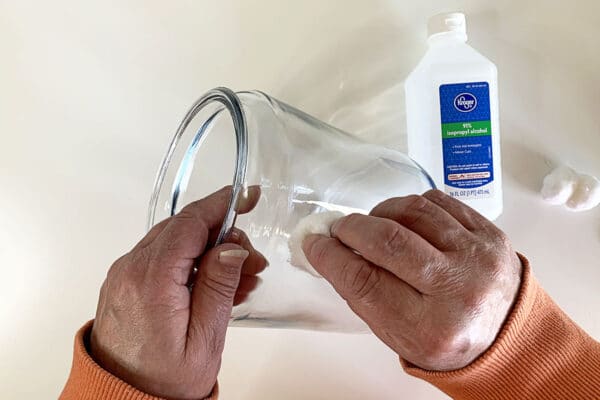
- Pour some rubbing alcohol on a cotton ball and wipe down the jar to remove any invisible fingerprints and oils from your hands.
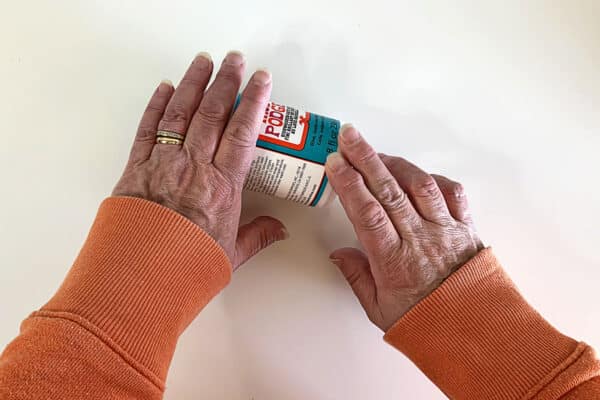
- Mix your bottle of Dishwasher Safe Mod Podge by gently rolling it back and forth. Violently shaking the bottle will result in air bubbles you do not want.
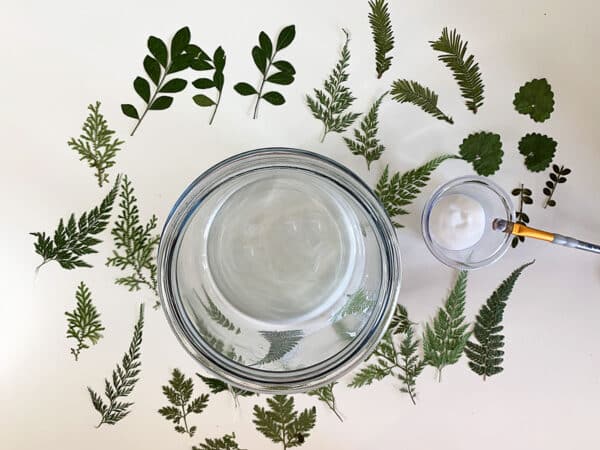
- Lay out flower and greenery pieces you want to incorporate into your project. You may not use all of them but it is useful to be able to see what you have to work with.

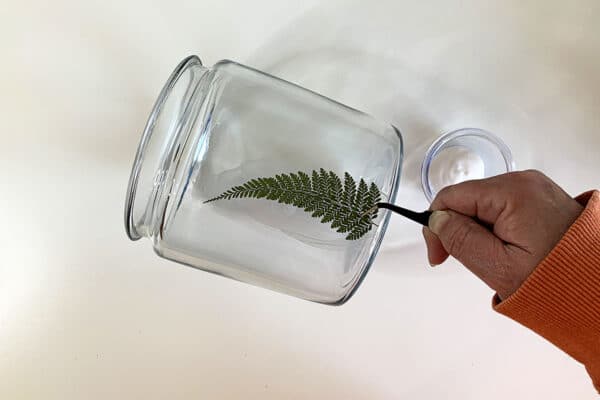
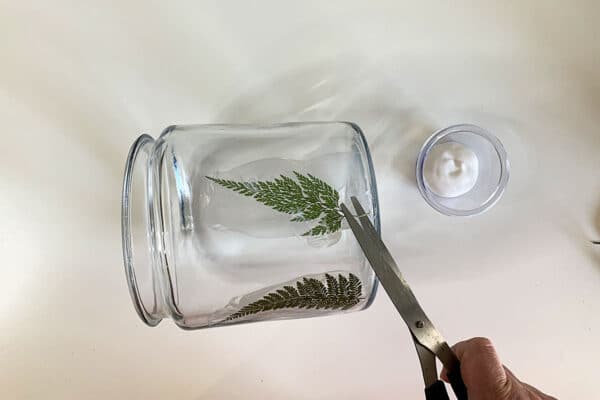
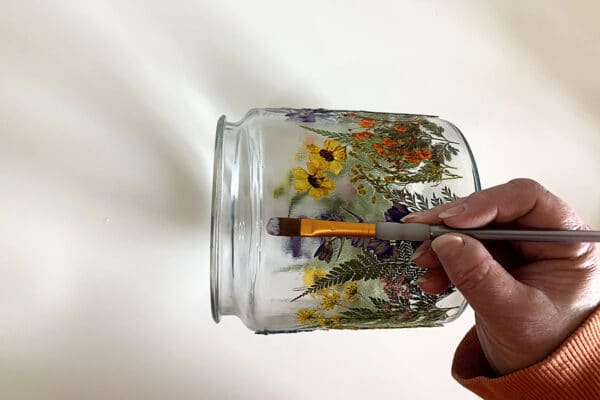
- With your tweezers, pick up a piece of greenery and lay it up against the jar to get an idea of its size. These dried flower pieces are very fragile, so it's best to always use tweezers.
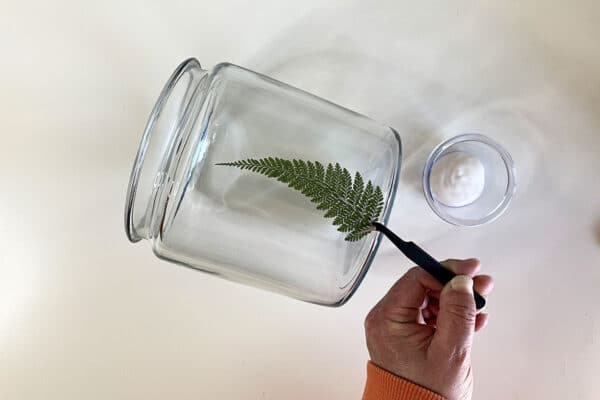
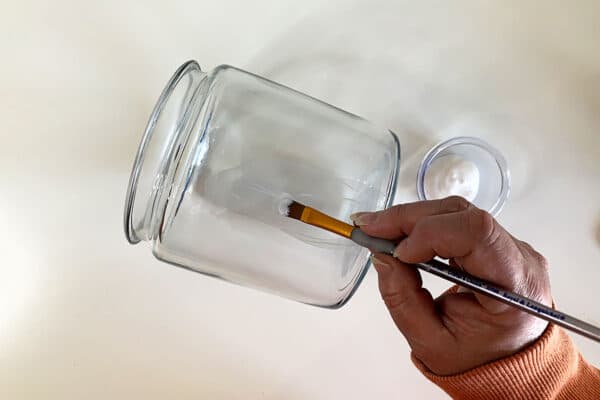
- Use your paintbrush to apply mod podge to the area where the greenery will go.
- Pick up the greenery again and apply it to that area.
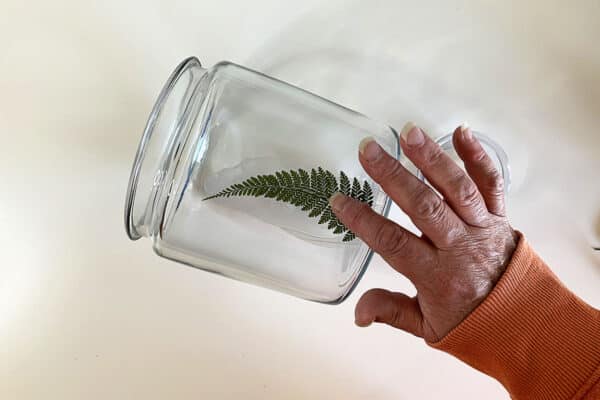
- Gently pat the greenery onto the mod podge so it makes solid contact with the jar.
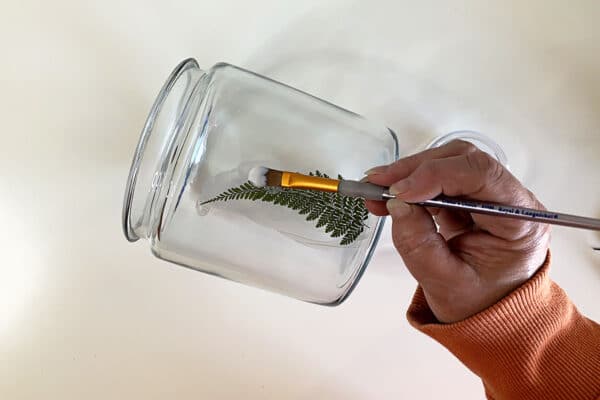
- Apply a thin coat of mod podge on top of the greenery.
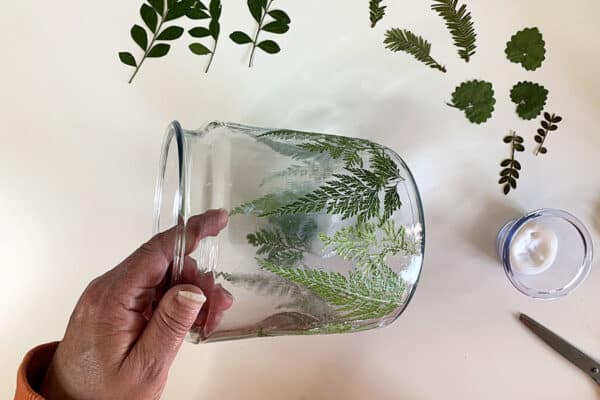
- Add in more greenery. You can snip off any long unruly stems as needed.
- Keep adding greenery until you have a nice spacing of ferns and/or leaves over the jar.
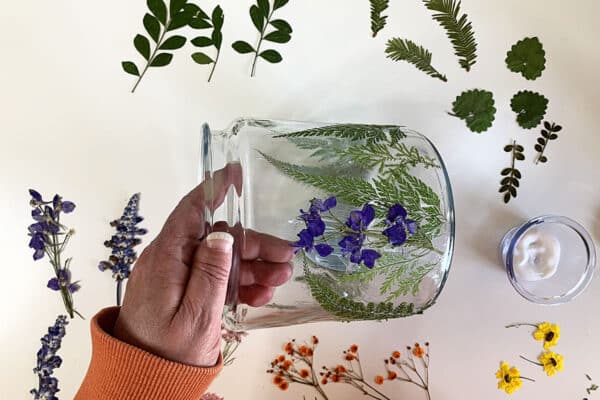
- Start adding flowers in the same manner. These will most likely be overlapping some of the greenery, but they don't necessarily have to.
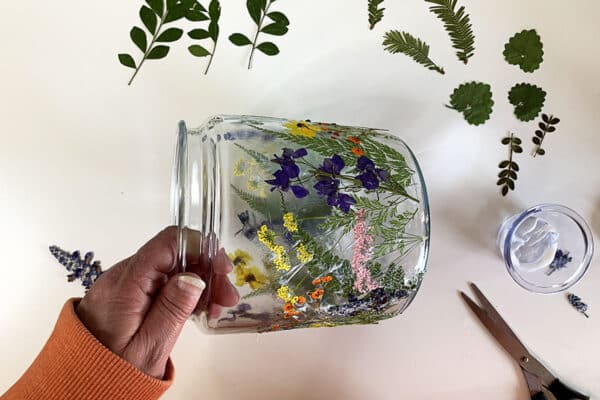
- Keep going until you feel you have a good amount of flowers and greenery on the jar. It's easy to go overboard, but the final look is totally up to you.
- Once you are done applying your dried flowers to the jar you will want to let the jar sit for 1-2 hours. Then apply 2-3 topcoats over the sides of the jar top to bottom (even where you have no flowers). Allow for 1-2 hours of dry time between coats.
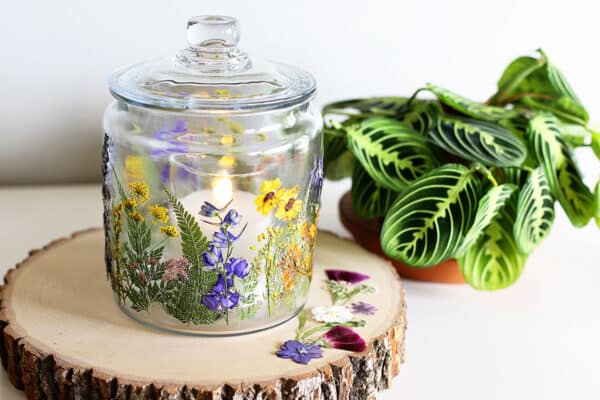
- I'm using my glass jar as a candle holder or lantern. Since the jar is enclosed I'm using a battery-operated LED candle so it won't get too hot. I have a link to the candle up in the supplies list. It's actually part of a 3 piece set of LED candles in pretty glass holders and they have realistic-looking flames. They're my latest obsession.
Notes
- Adding 2-3 topcoats with 1-2 hours dry time between coats is necessary to the success of your project
- Your project MUST cure for 28 days before it is dishwasher safe
Tips For Using Dishwasher Safe Mod Podge
- Make sure your glass object is thoroughly clean. Either wash with soap and water or wipe down with rubbing alcohol soaked cotton balls. Even though it may look clean to you, it can still have grease and fingerprints from your hands. It must be absolutely free of dust and grime.
- Roll the bottle to mix it, don't shake it. Shaking can cause air bubbles, which you want to avoid.
- Use a soft bristle brush to apply the mod podge. Foam brushes are notorious for leaving bubbles everywhere.
- Add 2-3 topcoats, allowing 1-2 hours dry time between coats. This is very important and is a longer wait time between coats than regular old mod podge. It dries much harder and needs the extra time for drying before the next coat goes on. And the numerous topcoats act as a sealer. If you don't adhere to the 2-3 topcoats and 1-2 hours between coatings rule, don't come crying to me when your project looks like crud and fell apart in the dishwasher. OK, realistically you can come cry on my shoulder and I'll give you a big hug, I'll be there for you no matter what. But just follow the rules so you can have a pretty piece!
- Your Project has to cure for 28 days in order to be fully dishwasher safe. You may feel that your item is good to go when it is dry to the touch, but the chemical reaction-ness (my scientific term there) that allows it to be washed isn't fully in effect until after 28 days. That doesn't mean you can't use the jar, just that you can't wash it right away.
- Only wash your piece by hand or in the top rack of the dishwasher. I don't know exactly what goes on in the the bottom rack of the dishwasher, but it's a little too wild and crazy for mod podged items.
- Do not apply mod podge close to or on an eating surface. Although we fancied up a storage jar this time and it isn't an issue in our case, just keep in mind for future projects that although it is non-toxic, it has not been approved by the FDA as officially food-safe. For instance, mod podge your napkins to the back of glass dessert plates or mod podge pretty little flowers toward the bottom of some drinking glasses rather than around the rim where your lips will be.
Where To Buy Your Pressed Flowers
It's always this time of year I regret not having thought of pressing and preserving some of my blooms from last year's garden. No need to fret, Amazon sells tons of varieties of dried pressed flowers.
These are the two packs that I purchased.
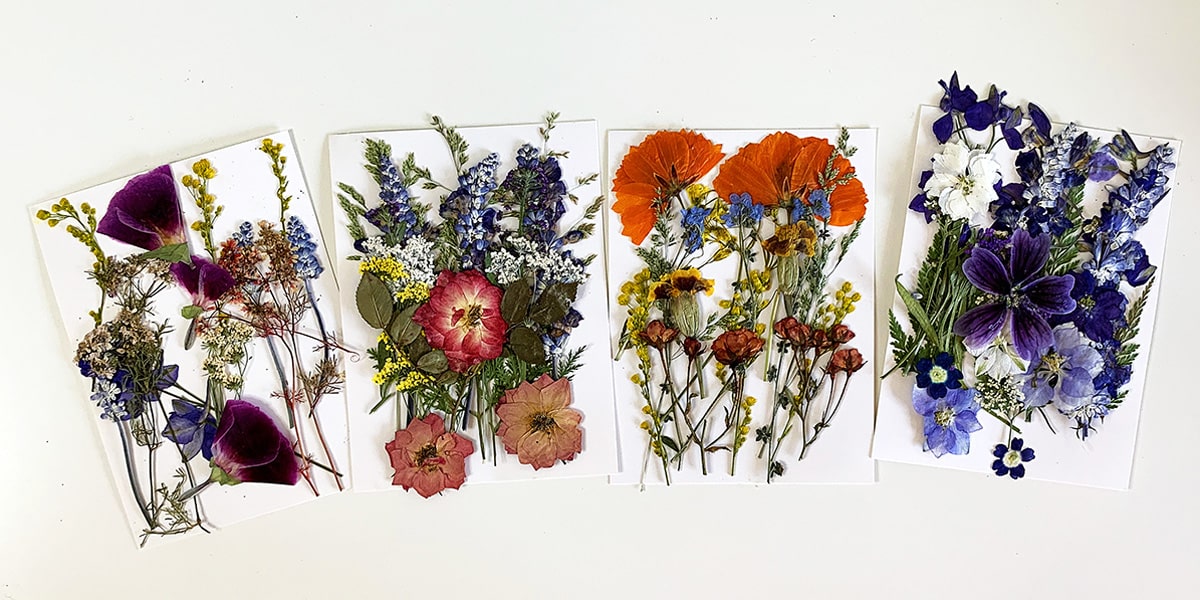
Bright and Colorful Pressed Flowers
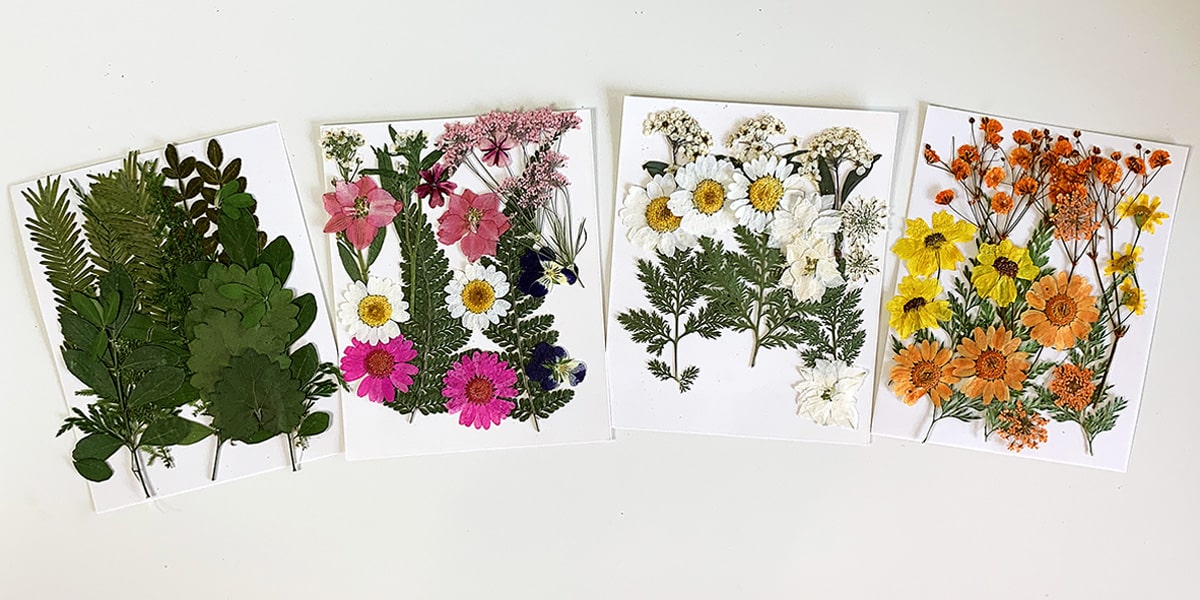
Muted Pressed Flowers With Lots Of Greenery
You do not need both.
I ordered the muted ones first because of all the extra green sprigs included, but then decided to order the more vibrant pack to put more spring-elicious color into my design.
I have PLENTY left over for more projects. I used maybe 1/10 of them.
And if you don't like those particular colors, just look around Amazon because they must have 100 different packets to choose from! (They may not be the best place to buy glass jars, but they make up for it in pressed flowers).
What Types Of Flowers Work Best For Decoupaging On Glass?
Flat flowers work best for decoupaging on glass. You'll notice when you get your packets of dried flowers there are some that are dried perfectly flat and others that are a little bulkier. The bulkier ones will stick out too far on the glass.
My packets has some beautiful dried roses and snapdragon but they were too thick to stick to the jar very well. They'd be great in a coaster resin project, but just not this one.
And most importantly, since I wanted to be able to wash this I didn't feel the thicker ones would hold up well in the dishwasher.
What Type Of Jar Works Best?
A jar with sides that are both straight and smooth works best.
Avoid jars with ridges or patterns on the side of the glass (for instance, Ball canning jars with the raised logo on the sides or their jelly jars with the all over quilted design). The patterns will not allow your flowers to lay smoothly and will interfere with the look of your gorgeous creation.
In this instance smooth and boring is best!
7 Fun Ways To Use Your Glass Jar
- Candle Holder or Lantern (see above)
- Laundry Pod or Laundry Soap Organizer
- Vase
- Terrarium
- Dog Treat Jar
- DIY Bath Salts Holder
- Growing Paper Whites Bulbs at Christmastime
What other ways do you use glass jars?
Linda
The Mod Podge on my glass is showing and sticky. What did I do wrong?
Pam Kessler
Oh, no!
Did you use the Dishwasher Safe Mod Podge (Gloss)? It's specifically made to dry clear, leaves a smooth finish and works well on glass and pottery. And did you let it dry a couple hours between coats? That's the only reasons I can think of why it might not have dried clear and is still sticky.
I've only had a clearness problem on the very first mod podge on glass project I tried when I put flowers in a locket for a necklace. I used WAY too much Mod Podge. Like it was swimming in the Mod Podge 🙂
Kimberly
This is GORGEOUS, Pam!!! I want to make it!!!
Grateful to have found this via the Cozy Little House blog today. 🙂
Deb
I recently did my first attempt at this and I certainly I’m no expert for first attempt they came out cute. The problem is I’m looking for something as an alternative to podge and I’m reading in places that you can use Cleo glue like Elmer clear glue because the Marge podge I use the glossy it smells so toxic I have asthma and even with a mask on I nearly had an asthma attack. I could never use this again.
Cheryl
Pam, thanks for the great idea and the laughs as always! I have that jar and use it on my countertop for my keurig coffee pods.
Max D
OMG! Just OMG - so cool! Thank you for sharing all your creations AND directions on how we can do the same!
Linda @ Itsy Bits And Pieces
This is such a great project, Pam! It turned out beautifully...great tutorial!
Pam Kessler
Thanks, Linda!
Carolyn Dinger
That really turned out beautiful. Going out today and look for the jar, but as I look around the house I do have a couple that can be used.
Pam Kessler
Thanks. It was fun to make. The hardest part was figuring out which flowers I wanted to use.
Eme
Hi Pam, this is really pretty. I do have a question, did you ever preserve fresh flowers? I am fortunate to have a kind husband who randomly buys me flowers. One of my favorites is the stargazer lily. I used to press leaves inside a heavy book but they would fall apart once handled. I want to one day try to incorporate some of these bouquets into a framed picture but not sure what type of coating to use so they don't crumble. Any thoughts would be greatly appreciated. Thanks.
Pam Kessler
I have not tried to preserve them, but I might try it this spring. I did find an article from HGTV which discusses all the different ways to preserve flowers - HGTV Article.
Linda
Could I use the same process on a corner of a mirror or the oval glass on our front door?
I love all your ideas. They are wonderful.
Linda Robbins
Pam Kessler
I don't see why not. If you are going to do it on the outside of the front door glass you might consider using the Outdoor formula that Mod Podge makes. If you're doing it on the inside, then this Dishwasher safe one would be ideal.
Linda
Thank you so much Pam. It's been years since I did any crafting, I had no idea there are so many different kinds of Mod Podge. Thank you for all your inspirations!
Create on!
Linda
Luisa
Pam, this is just gorgeous. I don't know how you come up with all these great ideas, but I love them. Thanks!
Pam Kessler
Thank you!