• Skip to primary navigation
  • Skip to main content
  • Skip to primary sidebar
House of Hawthornes
  • DIY
  • Gardening
  • Decorating
  • Thrifting
  • Recipes
  • Seasonal
menu icon
go to homepage
  • DIY
  • Gardening
  • Decorating
  • Thrifting
  • Recipes
  • Seasonal
  • 🛒 Our Amazon Shop
    • Facebook
    • Instagram
    • Pinterest
    • Twitter
    • YouTube
  • search icon
    Homepage link
    • DIY
    • Gardening
    • Decorating
    • Thrifting
    • Recipes
    • Seasonal
    • 🛒 Our Amazon Shop
    • Facebook
    • Instagram
    • Pinterest
    • Twitter
    • YouTube
  • ×
    Home » DIY & Crafts

    I'm sPinning Over Pinwheels

    Published by Pam Kessler | 367 words. · About 2 minutes to read this article. -

    The good thing about Pinterest is that you see all sorts of neat craft project that you just have to make.

    The bad thing about Pinterest is that you see all sorts of neat craft project that you just have to make.

    As in, they bug the bejeebers out of you and sit in the back of your mind nagging at your subconscious until you just have to run to the store at 9:00 at night to buy the supplies for the project.

    DIY pinwheels.

    This was one of those projects.

    How to make your own pinwheel.

    How To Make DIY Pinwheels That Spin

    Supplies

    • 6x6 double-sided scrapbook paper
    • wood skewers normally used for shish kabobs
    • scissors
    • ruler
    • paper hole punch
    • brads (found in the scrapbooking embellishment area of your local Michaels, JoAnns or Hobby Lobby)
    • a little bit of glue, if you are so inclined


    Supplies for making pinwheels at home.

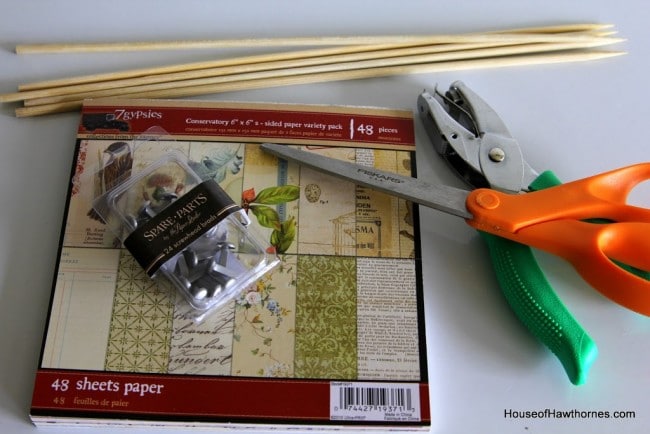
    You could cut your own paper into the correct size, but the 6x6 paper was so darn convenient. The double-sided paper is important since you can see both sides of the paper when looking at the front of the pinwheel.

    Instructions

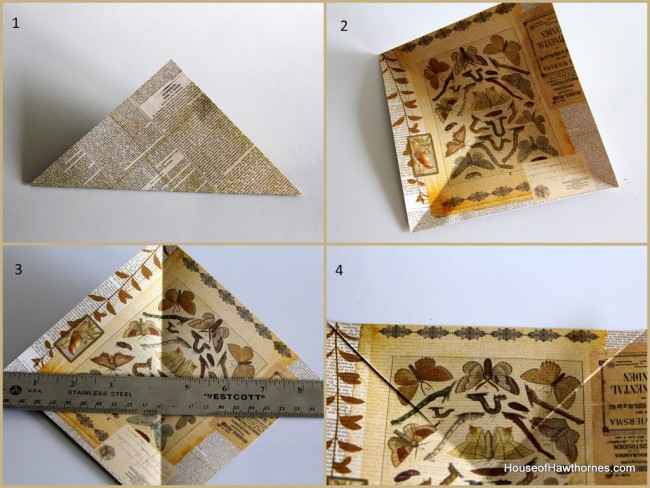
    1. Fold my paper in half diagonally.

    2. Then fold in half again.

    3. Use a pencil to mark a tiny dot 3" into the pinwheel.

    4. Cut 3" into each corner to that dot to create your pinwheel spokes.

    How to make your own pinwheel.

    5. Punch a hole in every other corner of the pinwheel.

    6. Take the brad and thread it through the punched holes.

    7. Until all holes are in the brad.

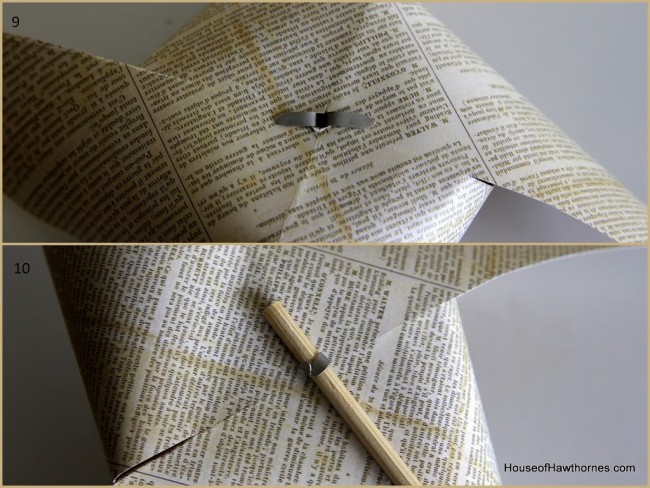
    8. Push the brad through the middle of the pinwheel (I used a little knife to cut a slit so it wouldn't rip the paper).

    How to make your own pinwheel.

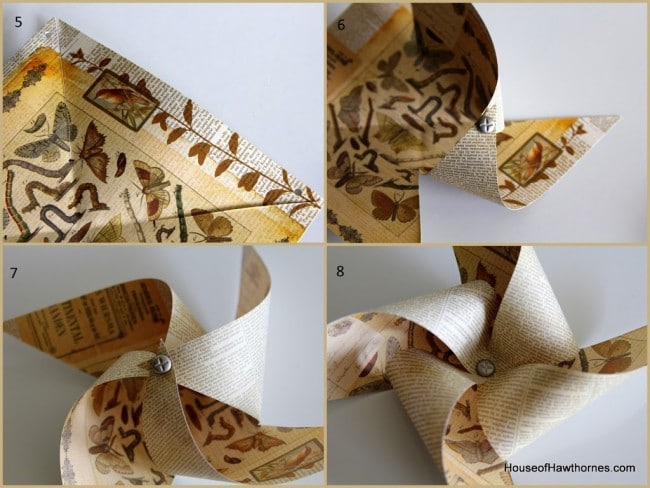
    9. Turn the flaps of the brad over to hold the pinwheel together.

    10. Attach your skewer to the pinwheel by folding the brad ends around the wood. You may need a tiny touch of glue to keep the pinwheel from sliding around on the skewer.
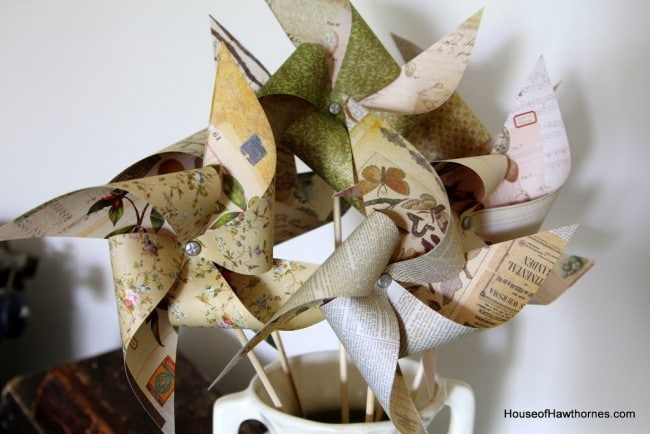
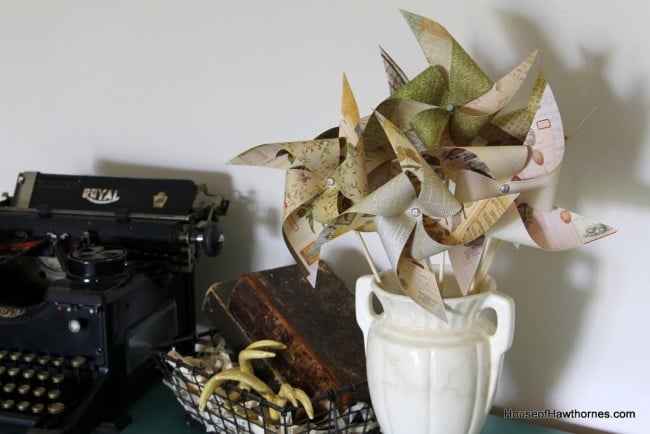
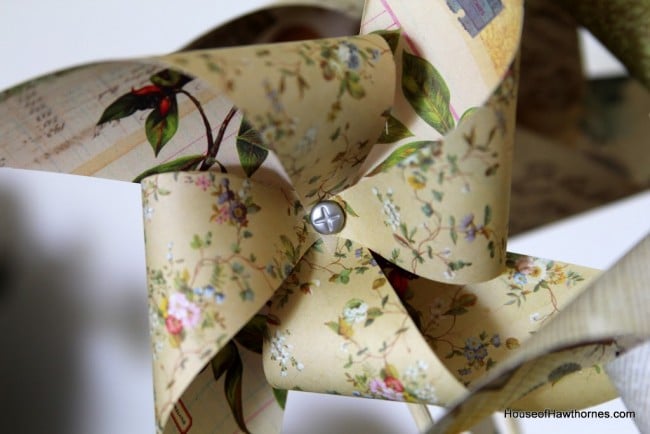
    Brads used in the making of paper piwheels.

    Voila. Pinwheels.

    Close up of pinwheels.

    BTW, they make a zillion types of brads. All different sizes, colors, and designs on them. I chose ones that look like screw heads.

    Your basic old-fashioned all-American slotted screws

    Brads used to make pinwheels from scratch.

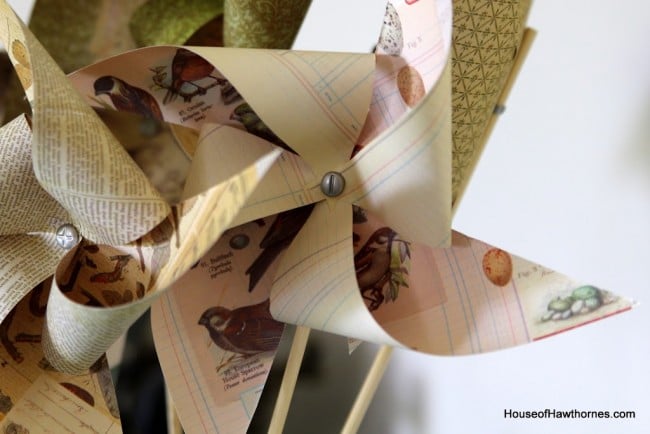
    and your newfangled Phillips head screws. Industrial pinwheels are all the rage.

    Brads used to make DIY pinwheels.

    Happy pinwheeling!

    « Crabapple Blossoms
    Vintage Enamelware Basin »
    3.2K shares
    • Facebook
    • X

    Reader Interactions

    Comments

    1. daiseyjayne

      August 28, 2012 at 6:53 am

      Very cute! I love Pinterest 😉

    2. Brandi

      April 25, 2012 at 7:07 am

      I love your pinwheels. Thanks for sharing your tutorial! I didn't see MMS's, so this is new to me! : )

    3. Pamela

      April 20, 2012 at 10:57 pm

      How fun is this??? I love it! I have not seen these in years!! They look great Pam.
      Too bad I didn't live closer i would love to make these with you!

    4. Heather

      April 20, 2012 at 10:48 pm

      Pam, your pinwheels are just adorable! I might have to give these a try. Thanks for sharing your cute project!

    5. Carol A.Bender

      April 20, 2012 at 7:39 pm

      Fantastic!

    6. Country Dreaming

      April 20, 2012 at 4:53 pm

      Those are too cute. Love the paper you chose.

      Might have to try these.

      melinda

    7. LizlovesVintage

      April 20, 2012 at 4:13 pm

      These are just so sweet!!! Perfect for any vignette! Thanks for sharing! See, your crafting and I'm getting recipes from there. Love that site!
      Have a great weekend,
      xxx Liz

    8. Paulette

      April 20, 2012 at 7:34 am

      Cute and displayed so nicely.

    9. Snooks

      April 19, 2012 at 9:59 pm

      Very cute and soooo easy. Love it!

      @ 3Beeze Homestead

    « Older Comments

    Primary Sidebar

    Hi, I'm Pam. Let me show you how to create a budget-friendly home you'll love using repurposed thrift store finds, easy DIY & craft projects, and seasonal flower gardening tips.

    More about me →

    Reader Favorites

    • How to make window art with glass plates from the thrift store for a mosaic look.
      Window Art With Glass Plates
    • Easy Homemade Candles In Granny's Candy Dish
    • Clean Silver With Baking Soda And Aluminum Foil
    • squirrel repellent
      Homemade Squirrel Repellent Recipe

    Gardening Tips

    • Tips on how to grow peonies. Everything from soil conditions to USDA Plant Hardiness Zones to ants. Includes how to cut peonies for flower arrangements.
      How To Grow Peonies - A Complete Guide
    • 25+ Upcycled Garden Ideas
    • DIY Terrarium: A Woodland Version
    • Hummingbird in flight feeding on flower.
      Best Homemade Hummingbird Nectar

    Footer

    ↑ back to top

    About

    • About Us
    • Contact
    • Privacy Policy
    • Web Stories
    • Blog

    Shop

    • Amazon Favorites
    • Shop The Look

    Newsletter

    • Sign Up For Emails & Updates

    Categories

    • DIY
    • Gardening
    • Budget Decor
    • Thrifting
    • Recipes
    • Seasonal

    Please use appropriate safety precautions when attempting projects. All projects are attempted at the reader's own risk.

    As an Amazon Associate, I earn from qualifying purchases.

    Copyright © 2025 House Of Hawthornes, LLC