• Skip to primary navigation
  • Skip to main content
  • Skip to primary sidebar
House of Hawthornes
  • DIY
  • Gardening
  • Budget Decor
  • Thrifting
  • Seasonal
menu icon
go to homepage
search icon
Homepage link
  • DIY
  • Gardening
  • Budget Decor
  • Thrifting
  • Recipes
  • Seasonal
  • 🛒 Our Amazon Shop
    • Facebook
    • Instagram
    • Pinterest
    • Twitter
    • YouTube
  • ×

    Home » DIY And Crafts

    My Krafty Felted Lampshade

    Published by Pam Kessler | 454 words. · About 3 minutes to read this article. - 37 Comments

    When I bought this hobnail lamp it had a pretty basic lampshade on it. I thought I needed something a little more fancy.

    Well, I worked on it this weekend and this is what I came up with.

    Lampshade cover made with felt flowers and Kraft paper.

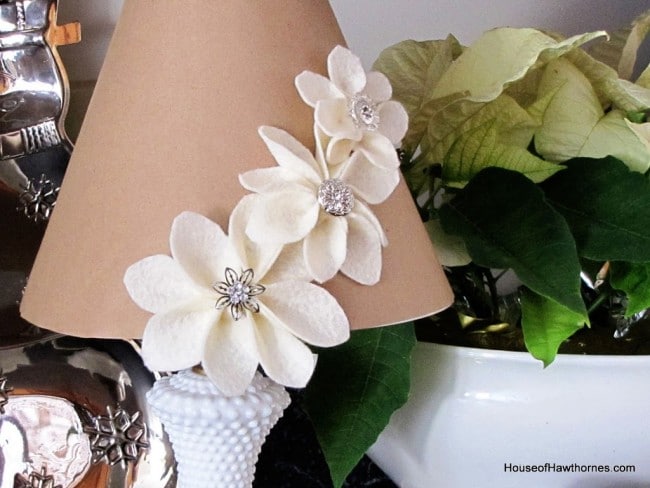
    Blinged up felt flowers on a kraft paper slipcover.

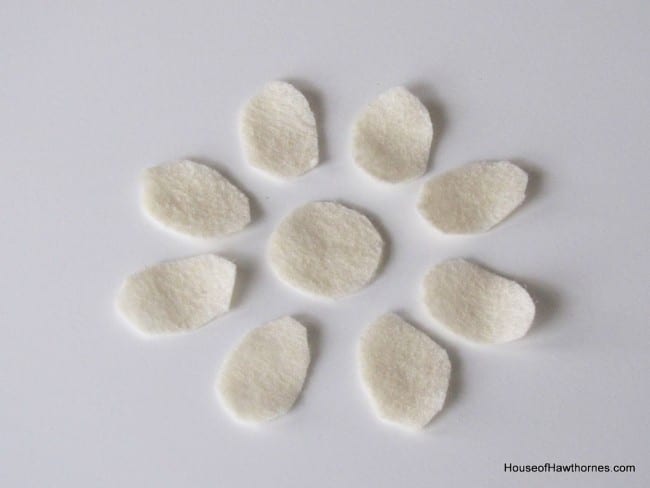
    For the felt flowers, I used an iced tea spoon to make a template.

    Using a teaspoon to make pattern for felt flowers.

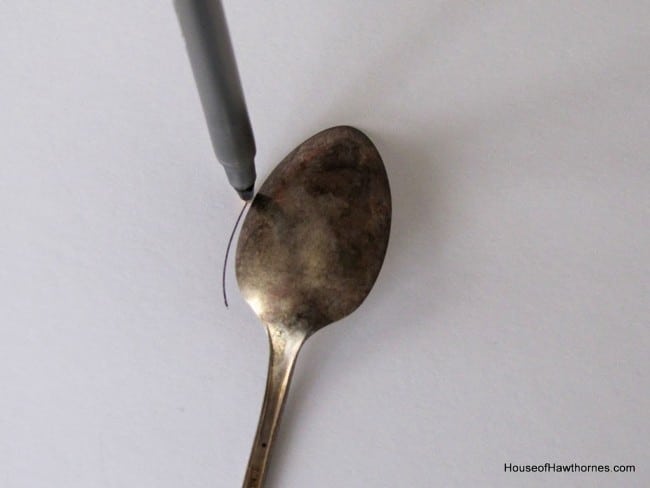
    And then made two more templates, slighter smaller than the preceding one,

    Three different sizes of felt flowers.

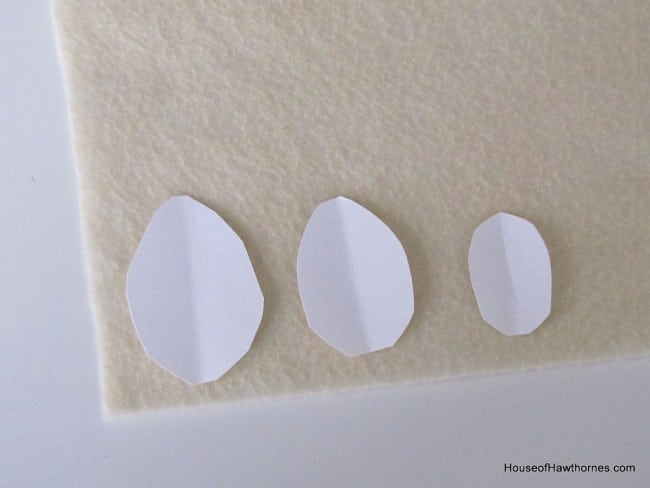
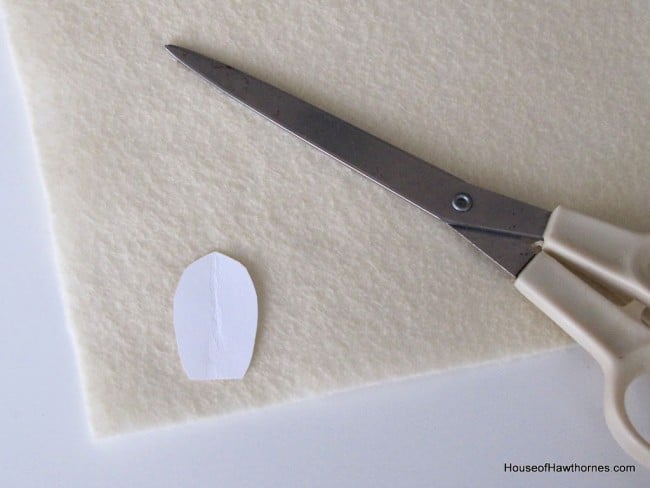
    and cut them out of the felt.

    It took less than one sheet of felt to make three flowers. Of course, I didn't know that when I was buying felt, so now I have 7 sheets of felt that will float around my craft drawer for the next year.

    Cutting out felt flowers.

    I cut a small circle for each flower also.

    Felt flower pieces.

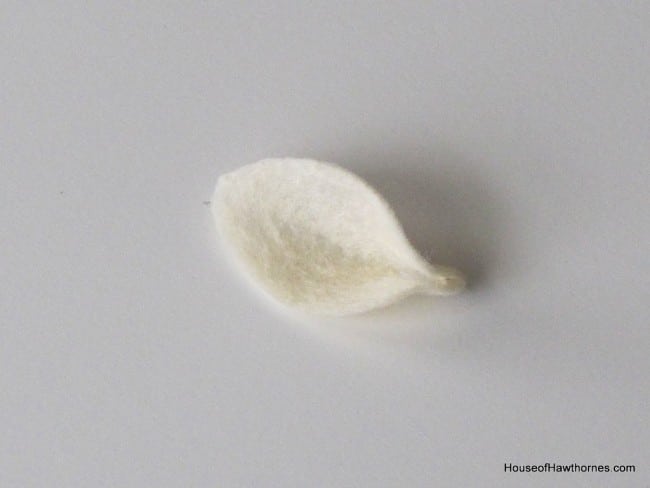
    A spot of glue was shot from the dreaded (and pretty ugly to photograph) hot glue gun onto the bottom of the petal

    Using hot glue gun to make felt flowers.

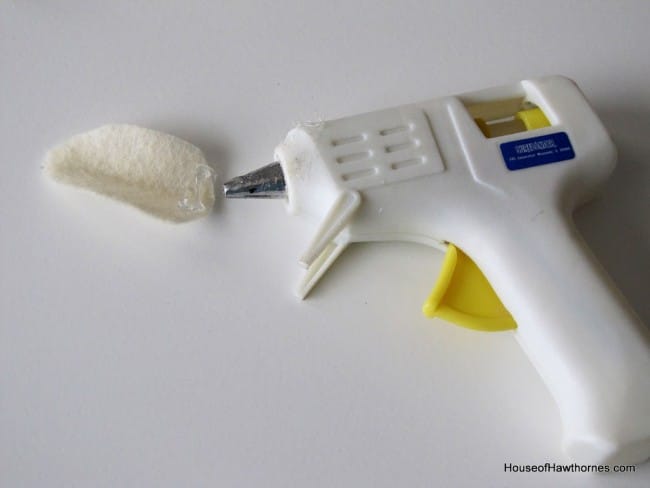
    and then the end was squished together. If there is a secret to doing this without burning your fingers, please share with the rest of the class.

    Making felt flowers.

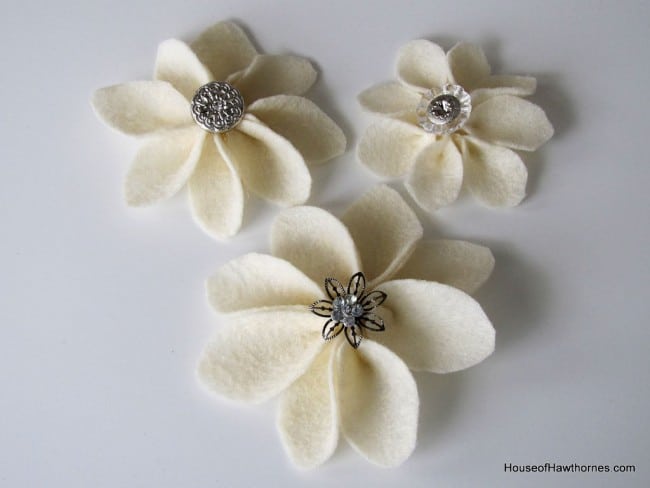
    I used eight petals for each flower

    Felt flower petals.

    and glued them to the felt circle.

    Combining petals to make a homemade craft flower.

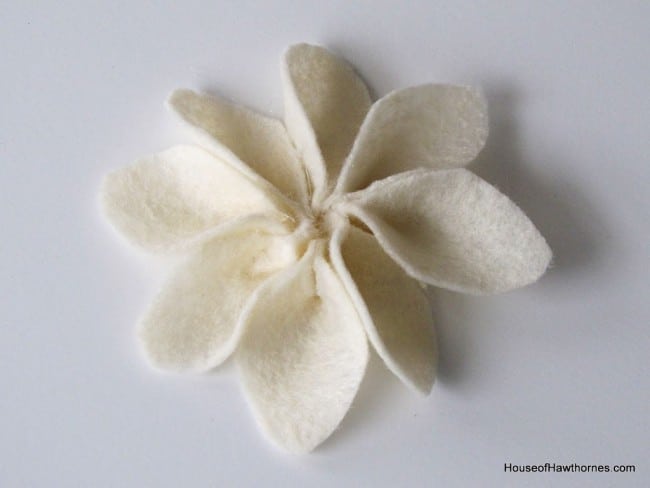
    A little bling was added to the middle.

    Adding a button to make the center of the flowers.

    I used Jim Holtz's buttons that I picked up at JoAnn Fabrics for my centers. They were on sale last week, otherwise I would have used my 40% off coupon for them. I ended up using my coupon on glue sticks (the highest priced item that was not on sale), saving a whopping $1.29. Not exactly an Extreme Couponing use of the 40% off.

    Jim Holtz buttons used as centers for craft flowers.

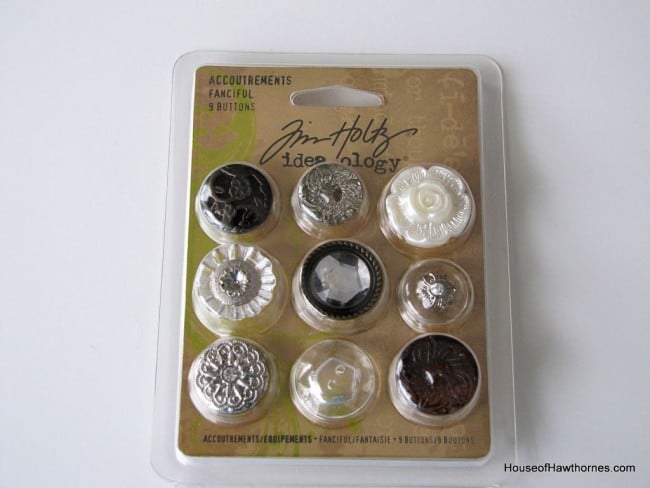
    You could use just about anything for the bling. In fact the bling on the largest flower is actually left over from my snowman bottle project from before Christmas.

    Final picture of felt flowers.

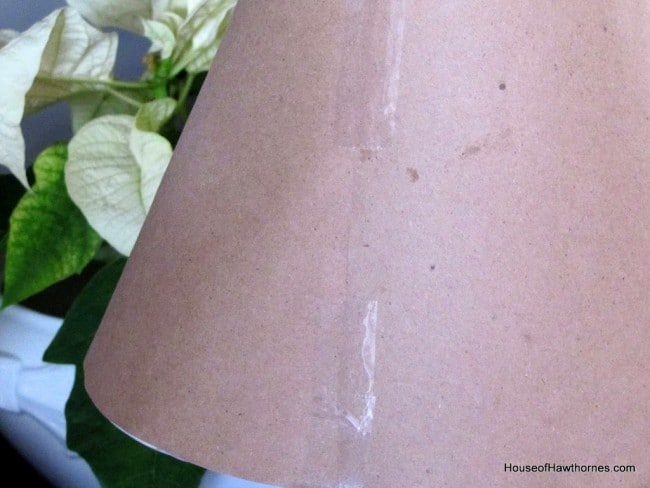
    Originally I was just going to glue the flowers to the white lampshade, but decided to make a slipcover for it out of kraft paper instead. I bought a roll of kraft paper at Dollar Tree for $1.00 (I bet you thought I'd say $2.00).

    Close up of flowers.

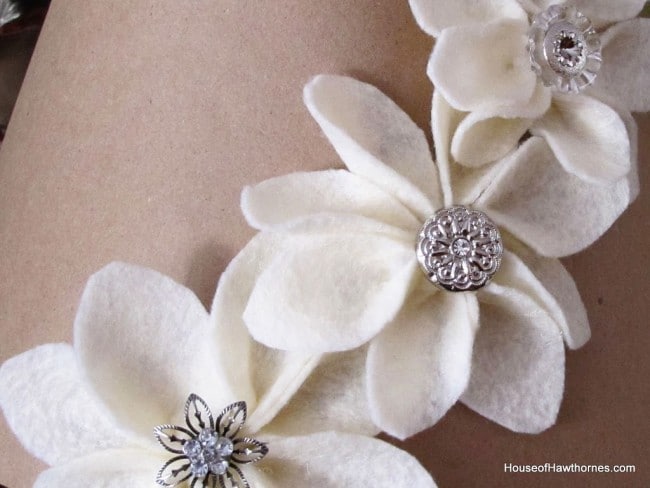
    I just traced the outline of the shade, cut it out and then taped it together in the back. Tricia at A Rosy Note had mentioned that she made a slipcover for her daughter's lamp and I thought that was a great idea.

    If I get tired of the flowers, I just take this slipcover off and try something else.

    Making a slipcover for a lampshade out of Kraft paper.

    I swear this poinsettia is plastic. It just keeps going and going and I haven't done anything to it in weeks. Aren't you a little thirsty?

    Lampshade cover using Kraft paper and felt flowers.

    So there's my solution. Hindsight being 20/20, I may have made the flowers a little smaller, but I am looking at it as an artistic statement.

    Homemade lampshade cover.


    « Top Ten Lists
    Croquet Box Anyone? »
    1.6K shares

    Reader Interactions

    Comments

    1. Debby

      January 15, 2012 at 7:51 pm

      Love it. I like that little Springer dog head too. Glad you did something inside and out of the cold weather.

      Reply
    2. Linda @ Itsy Bits And Pieces

      January 15, 2012 at 7:52 pm

      That turned out so great, Pam! Love the touch of bling on the flowers! Great tutorial! I follow Faye's boards, too...always great goodies!

      Reply
    3. [email protected] Charm

      January 15, 2012 at 7:57 pm

      Okay Pam...I'm saving this one...I have lots of shades that are just waiting on a makeover. Looking beautiful...my friend! Hope to see it at NTT:)

      Blessings,
      Linda

      Reply
    4. NanaDiana

      January 15, 2012 at 8:02 pm

      Well, you may have taken the ideas from someone else but your lampshade is your own creation. Great idea with the craft paper! xo Diana

      Reply
    5. NanaDiana

      January 15, 2012 at 8:03 pm

      Ohhhh..forgot to say it is very pretty- I love it! xo Diana

      Reply
    6. Olive Cooper

      January 15, 2012 at 8:08 pm

      I am now positively scared of you and that glue gun. Love them.

      Reply
    7. Kim K.

      January 15, 2012 at 8:17 pm

      Brilliant! Totally loving your spin on their ideas. The lampshade is simply divine.

      Reply
    8. Tammi Evette

      January 15, 2012 at 8:17 pm

      I love it!

      Reply
    9. Cozy Little House

      January 15, 2012 at 8:22 pm

      It is adorable! Just love the flowers.
      Brenda

      Reply
    10. debbie refresh restyle

      January 15, 2012 at 8:53 pm

      Pam, I love it! What a great idea! I may have to make some of those cute flowers, I don't know what I do with them!
      Debbie

      Reply
      • Pam

        January 16, 2012 at 11:53 am

        If you put a pin on the back you can put them on your lapel. I'm going to make one like that for coat, but I'm going to make it with a few layers of leaves so it's fluffier.

        Reply
    11. Vickie @ Ranger 911

      January 15, 2012 at 9:45 pm

      I've never heard of a slipcover for a lampshade. What a good idea! Now you can change it out for the seasons. Cute!

      Reply
    12. Karla Medina

      January 15, 2012 at 10:26 pm

      Love this idea. I'm going to revamp some lamp shades soon and this seems like the perfect way to do it. Visiting from Between Naps on the Porch 🙂 and now a new follower

      Reply
    13. Heather

      January 15, 2012 at 10:43 pm

      Those flowers are adorable, and they could be used for so many things! Great job, Pam!

      Reply
    14. Into Vintage

      January 16, 2012 at 1:16 am

      I saw those lampshades on your pinboard and loved them! (checked out the tutorial as well). Your version is charming.

      If I ever decide to make these flowers, I'll have to substitue needle & thread for glue gun as I am completely glue-gun-impaired and am well beyond professional help at this point.

      Reply
    15. TARYTERRE

      January 16, 2012 at 2:44 am

      I'm feeling a little better. Thought I'd check online to see how you are doing. Imagine my surprise to see your lamp. It's GORGEOUS. Very clever. GREAT job.

      Reply
    16. Loo xx from Jumbles and Pompoms

      January 16, 2012 at 6:03 am

      This is utterly brilliant, Pam. I love that it has a slip cover too. If you've got a moment, can you let me know what US kraft paper is. Many thanks. xx

      Reply
      • Pam

        January 16, 2012 at 7:38 am

        It's the brown paper that you wrap packages when you mail them. It looks like the paper bags in the supermarket, but it's much thinner.

        Reply
    17. LizlovesVintage

      January 16, 2012 at 9:56 am

      My sign would say, " FLY THIS WAY." If you know what I mean. Ha, Ha.
      Oh, Pam. You have out done your self. This lamp has come a long way.
      From a thrift to a piece of Art. I'll have to ck. out pinterest.
      Thanks for giving me the heads up. I found a lamp thrifting on Sat.
      I'll post a picture this week.
      xxx Liz

      Reply
    18. michelle

      January 16, 2012 at 10:07 am

      That turned out so cute, I love the flowers and their centers. The slipcover idea is wonderful as well, I always like changing things up. Beautiful!
      xo

      Reply
    19. Mark

      January 16, 2012 at 10:59 am

      Very pretty!
      I was never worried. I knew you'd make it look terrific.
      m.

      Reply
    20. Dee in Oregon

      January 16, 2012 at 1:49 pm

      Dee in Oregon

      I think it's just darling - nice job!!!

      Reply
    Newer Comments »

    Leave a Reply Cancel reply

    Your email address will not be published. Required fields are marked *

    Recipe Rating


    Primary Sidebar

    Learn how to create a budget friendly home you'll love using repurposed thrift store finds, easy DIY & craft projects and seasonal gardening tips.

    Trending Content:

    • DiY pipe shelves in the bathroom.
      DIY Industrial Pipe Shelves
    • Tips on how to grow peonies. Everything from soil conditions to USDA Plant Hardiness Zones to ants. Includes how to cut peonies for flower arrangements.
      How To Grow Peonies - A Complete Guide
    • how to paint front door without removing it
      How To Paint A Front Door Without Removing It
    • squirrel repellent
      Homemade Squirrel Repellent Recipe
    • DIY Earring Holder
    • How to Make A Penny Bowling Ball
    • thrift store shopping tips
      Top 10 Thrift Store Shopping Tips
    • A 30 minute Blueberry Crostata Recipe. Also known as galette, rustic pie or rustic tart, it is perfect for new bakers You can't go wrong with this one.
      Blueberry Crostata Recipe
    • How To Make Winter Porch Pots
    • How To Grow Hydrangea In Pots

    About Me

    Pam Kessler | Author of House Of Hawthornes

    Footer

    ↑ back to top

    About

    • About
    • Contact
    • Privacy Policy
    • Web Stories
    • Blog

    Newsletter

    • Sign Up For Emails & Updates

    Shop

    • Amazon Favorites
    • Shop The Look

    Please use appropriate safety precautions when attempting projects. All projects are attempted at the reader's own risk.

    As an Amazon Associate, I earn from qualifying purchases.

    Copyright © 2023 House Of Hawthornes, LLC

    🍪 We use cookies to give you the most relevant experience by remembering your preferences and repeat visits. By clicking “Accept”, you consent to the use of ALL the cookies.
    Do not sell my personal information.
    I Accept Read Privacy Notice
    Privacy & Cookies Policy

    Privacy Overview

    This website uses cookies to improve your experience while you navigate through the website. Out of these cookies, the cookies that are categorized as necessary are stored on your browser as they are essential for the working of basic functionalities of the website. We also use third-party cookies that help us analyze and understand how you use this website. These cookies will be stored in your browser only with your consent. You also have the option to opt-out of these cookies. But opting out of some of these cookies may have an effect on your browsing experience.
    Necessary
    Always Enabled

    Necessary cookies are absolutely essential for the website to function properly. This category only includes cookies that ensures basic functionalities and security features of the website. These cookies do not store any personal information.

    Non Necessary

    Any cookies that may not be particularly necessary for the website to function and is used specifically to collect user personal data via analytics, ads, other embedded contents are termed as non-necessary cookies. It is mandatory to procure user consent prior to running these cookies on your website.